The hip thrust is an amazing exercise for building the glutes, specifically the gluteus maximus – our outer most glute muscle and the largest and strongest muscle in the body. If strength, hypertrophy (increase in the size of muscle fibres) and fat loss are your goals then look no further than the hip thrust.
Activating more muscle fibres during a given exercise leads to an increase in fat oxidation (burning). After a bout of high intensity resistance training, fat oxidation can be increased for up to 48-72 hours. As a compound exercise the hip thrust should and can be trained in various reps and set schemes. Keeping in mind there will be some crossover between strength and hypertrophy adaptations in the commonly touted ‘optimal’ ranges for these i.e. Strength 1-6 reps, and hypertrophy 8-12 reps. Fat loss will occur with both as long as intensity (training to or close to muscular failure during each set) is high enough. There are various ways to perform this exercise but the most common, and the variation that allows for more weight to be lifted, is a barbell hip thrust using a bench. Note – this can also be performed with a dumbbell, kettle bell or bands.
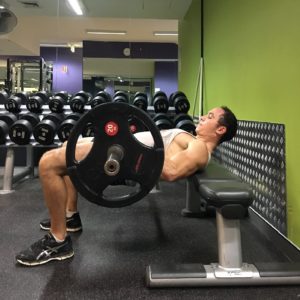
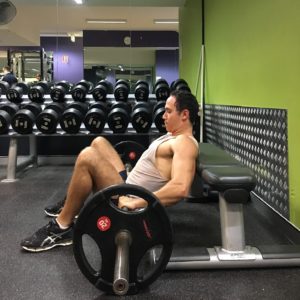
Below are steps to an effective and safe hip thrust :
- Set up – Back: The edge of the bench should be pressing against the bottom of your shoulder blades. You shouldn’t move or slide out of this position during the exercise.
- Set up – Legs: A medium to wide stance should be used with your feet slightly pointed outwards – this will increase glute activation. Shins should be vertical and perpendicular to the ground to maximise glute activation. If your feet are too close to your glutes this will transfer more load to the quads, and if your feet are too far from your glutes load will be increased through the hamstrings.
- Set up – Bar position: The bar should rest just above your pubic bone, and shouldn’t roll forward or backward. This position will be okay when you begin the exercise and aren’t using heaver loads, as your strength progresses you may need use a bar pad to prevent pain or discomfort over your pelvic region.
- The lift – Push through your heels: Keep your weight through your heels and drive them into the ground. If most of your weight is through your forefoot, quad activation will be increased. Feet can be kept flat, however it can be helpful to raise your toes off the ground.
- The lift – Keep knees out: Don’t let your knees cave inwards, this will decrease glute activation. A resistance band can be worn just above the knees as a cue to push the knees out and help switch your glutes on.
- The lift – Full hip extension: This is the lock out position at the top of the movement, glute max is in its most shortened position therefore highest level of activation.
- The lift – Posterior pelvic tilt: As we lift the hips of the ground – extending them, try to bring your pubic bone closer to your rib cage by squeezing the glutes think about ‘tucking them under’. This will prevent lumbar hyperextension, keeping the back safe when under heavy load.
- The lift – Keep ribs down: When we are posteriorly rotating the pelvis try to keep the ribs down, if they flare out this can cause unwanted lumbar hyperextension.
- The lift – Head and eyes forward: Maintaining forward positon of the head, will promote posterior pelvic tilt increasing glute activation. Look forward at the bottom position of the lift, as you extend your hips maintaining this position will cause the head and neck to flex forward.
- The lift – Deep breath in and hold: Take a deep breath in at the bottom of the movement and hold your core tight. This will increase intersegmental rigidity or spinal stability, preventing excessive spinal movement and reducing risk of injury.
